
A Beginner’s Guide to Docker for Data Science: Putting AI in Powerful Containers
You spend weeks working on your laptop to create a great machine learning model. It works perfectly. You’re happy. Then you try to run it on a coworker’s computer, but it crashes. It appears that a different version of Python is being used. Missing libraries. A number of settings that are all messed up.
Does this ring a bell?
Docker is going to be your new best friend if you’ve ever pulled your hair out trying to get someone else’s code to work or wondered why your model works on your machine but not on anyone else’s.
I get it. At first, “containerization” and “Docker” sound like things that only DevOps engineers need to know. But here’s the thing: Docker is one of those tools that will make you wonder how you ever got by without it. And by the end of this guide, you’ll know exactly how to use it for your data science projects.
What You’ll Learn and Why It Matters
We’ll show you everything you need to know about using Docker for data science and AI. No extra words or hard-to-understand language—just useful information. You’ll learn:
What Docker is
Why it’s important for your ML projects
How to make your first container
How to make workflows that work on any machine, every time.
What do you gain from it? You will save hours (or even days) fixing problems with your environment, make your work reproducible, and deploy models like a pro. Let’s get started.
Why Docker is a game-changer for data scientists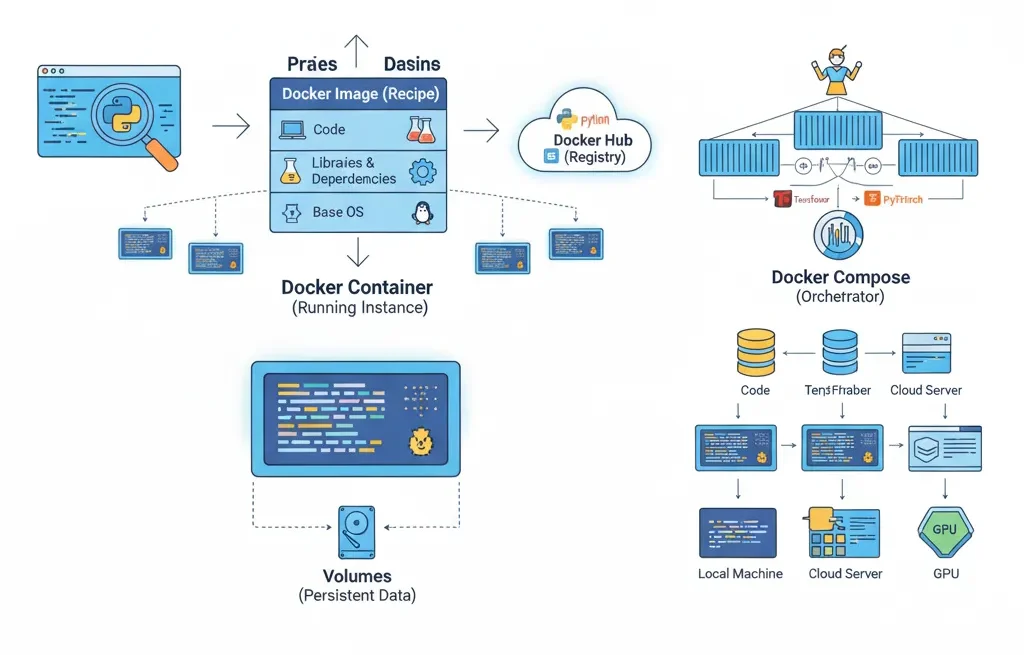
The “It Works on My Machine” Problem

You know that uncomfortable moment when you give your notebook to your team and they can’t get it to work? Or when you trained a model six months ago and can’t even remember what versions of the libraries you used?
Docker takes care of that issue.
Docker packs all the parts your app needs into a single, tidy box called a container. This includes your code, all the libraries, the right versions, and the files that set things up. It’s like a lunchbox that has everything you need to eat a full meal. No matter where you open it, whether it’s in New York or Tokyo, you’ll get the same food.
What makes Docker different from virtual machines?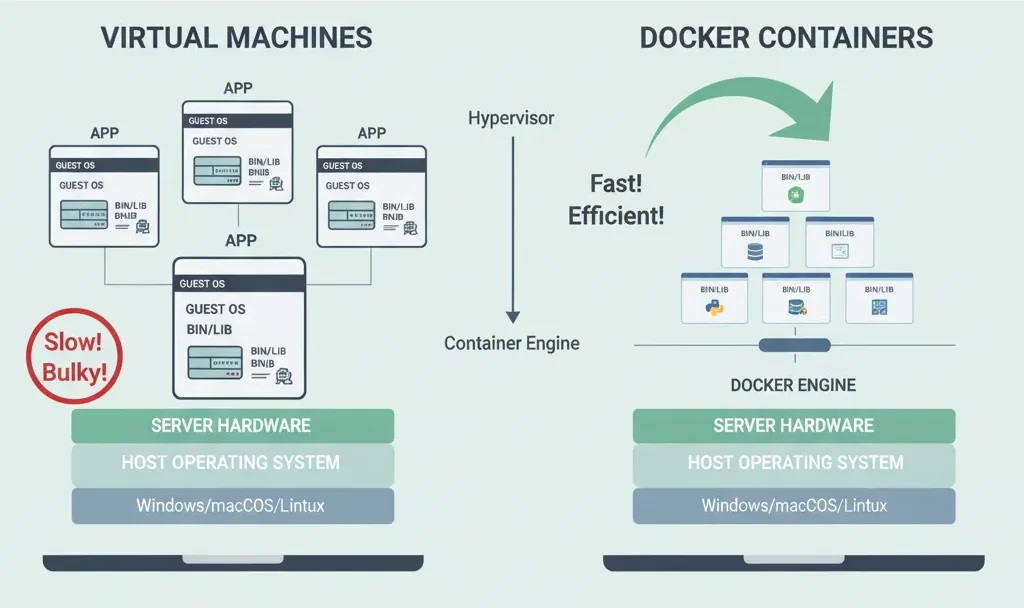
You might be thinking, “Isn’t this just like a virtual machine?” Not really.
| Feature | Virtual Machines (VMs) | Docker Containers |
| Analogy | Like making a whole house just to store your shoes. | Like a lightweight lunchbox. |
| Weight | Heavy, take a long time to start up, use a lot of resources. | Light (megabytes instead of gigabytes). |
| Startup Time | Minutes. | Milliseconds. |
| Capacity | Consumes a lot of space. | Run dozens on the same computer. |
| Virtualization | Virtualizes the hardware. | Only virtualizes the operating system layer. |
The main difference is that VMs virtualize the hardware, while Docker only virtualizes the operating system layer. This makes containers much better for what we really need in data science: environments for our code and models that are always the same and can be moved around.
The Real Advantages of AI and ML Work
Let me go into more detail about why Docker is important for machine learning:
Consistency: It doesn’t matter if you train a model on your laptop, a server, or in the cloud; it will work the same way. No more “it works on my machine” excuses.
Reproducibility: Do you remember the big news from three months ago? Docker captures the whole environment, so you can exactly reproduce it. This is very important for both research and production.
Collaboration: Collaboration is easy because everyone on your team can work in the same space. Just send out the Docker image, and everyone will know what’s going on.
Faster Deployment: Package all of your model’s dependencies together and then deploy it anywhere. Cloud platforms really like Docker containers.
Resource Efficiency: Because containers use much less memory and CPU than virtual machines, you can run more experiments at the same time.
Easy Access to GPU: Do you need to use a GPU to run your deep learning model? Docker has built-in support for NVIDIA.
The Basic Ideas Behind Docker
Before we start building things, let’s get the words right. Don’t worry; you only need to know a few simple things.
Pictures: Your Plan
A Docker image is like a recipe or a template. It is a read-only file that contains all the files your application needs to run, such as the operating system, your code, libraries, dependencies, and other files. A picture is like a picture of the whole world. You can’t run an image right away; you have to turn it into a container first.
Containers: The Instance You Are Running
You get a container when you run an imge. This is the real, working version of your app. The container is the food you made from the recipe, and the picture is the recipe. You can make more than one container from the same picture, just like you can make more than one cake from the same recipe. Each container works on its own and is not connected to the others.
Dockerfile: Your Recipe Card
A Dockerfile is a file that tells Docker how to create an image. It’s like writing down the steps so that anyone can make your space again.
Here’s a very simple example:
FROM python:3.9-slim
WORKDIR /app
COPY requirements.txt .
RUN pip install -r requirements.txt
COPY . .
CMD ["python", "train_model.py"]
This Dockerfile says, “Start with Python 3.9, set up a working directory, install my dependencies, copy my code, and run my training script.” Simple, right?
Docker Hub: Your Recipe Book
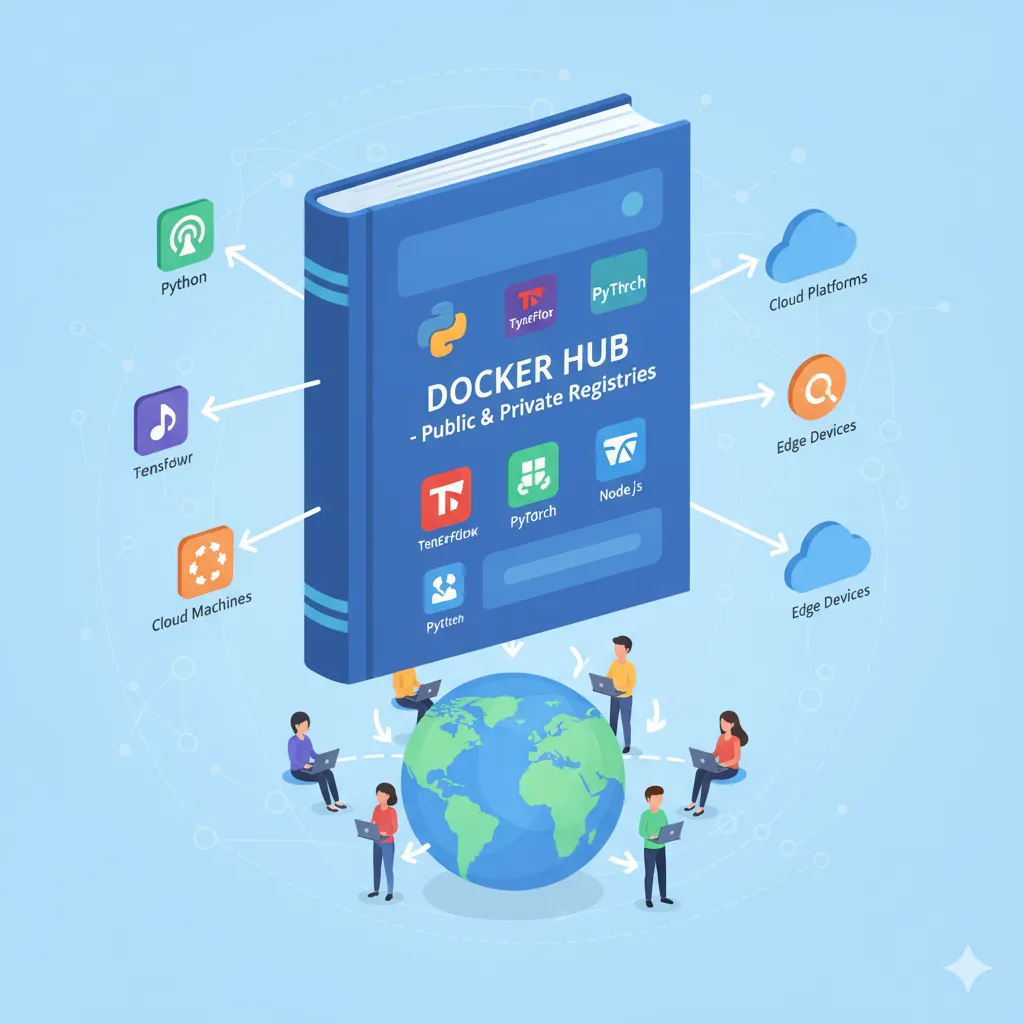
GitHub is a place to store code, and Docker Hub is a place to store Docker images. This big online registry has ready-made images for just about anything. You can use Python, TensorFlow, PyTorch, Jupyter notebooks, and more.
You don’t have to start over; you can just get an official image and change it to fit your needs. There are millions of pictures to choose from, and billions of them are downloaded every month.
Volumes: The Place Where You Keep Your Data
The idea is that containers should only be used for a short time and then thrown away. But what about your data? What about your datasets, trained models, and results?
That’s when the volumes come in. Volumes are places that Docker keeps things and that stay even after containers are deleted. You can plug them into any container, just like you would an external hard drive.
Docker Compose: The Conductor of Your Orchestra
When you need more than one container to work together, like a web app, a database, and an ML model server, you use Docker Compose. You can use it to create your entire multi-container app in a single YAML file and start everything with a single command.
Installing Docker: Getting Your Hands Dirty
That’s enough theory for now. Let’s really get this thing going. It’s very easy to put together.
Visit
docker.comand download Docker Desktop for your computer’s OS. It doesn’t matter if you have Windows, Mac, or Linux; the installation is simple. Simply run the installer and do what it says.Docker Desktop has everything you need: the Docker engine (which runs containers), command-line tools, and a user-friendly graphical interface for managing your containers.
When you’re done installing it, open your terminal and type:
docker -version
Great job! If you see a version number, you’re good to go.
Hello World: Your First Container
Let’s get your first container going. Put this in your terminal:
docker run hello-world
Docker will download a small test image and run it. You will get a message that says Docker is working.
What just happened? Docker searched your computer for the hello-world image but couldn’t find it. Instead, it downloaded it from Docker Hub, created a container from it, and ran it. That’s pretty cool, isn’t it?
Building Your First Data Science Container
Let’s make something useful now: a box for a real machine learning project.
Step 1: Get your project ready.
Create a folder for your project:
mkdir my-ml-project
cd my-ml-project
Step 2: Write a basic ML script.
Create a file named train_model.py:
import load_iris from sklearn.datasets
import RandomForestClassifier from sklearn.ensemble
from sklearn.model_selection import train_test_split
import accuracy_score from sklearn.metrics

# Get the information
data = load_iris()
X, y = data.data, data.target

# Divide the information
X_train, X_test, y_train, y_test = train_test_split(
    X, y, test_size=0.3, random_state=42
)

# Teach the model
model = RandomForestClassifier()
model.fit(X_train, y_train)

# Check
predictions = model.predict(X_test)
accuracy = accuracy_score(y_test, predictions)

print(f"Model Accuracy: {accuracy:.2f}")
It’s very simple to use this script. It uses the iris dataset to train a random forest classifier.
Step 3: Create a file with what you need
Make a file named requirements.txt:
scikit-learn==1.3.0
numpy==1.24.3
Step 4: Write your Dockerfile.
Make a file with no extension called Dockerfile:
# Start with the official Python picture
FROM python:3.9-slim

# Set the directory where the work will be done
WORKDIR /app

# First, copy the requirements to improve caching.
COPY requirements.txt .

# Get the things you need
RUN pip install -r requirements.txt --no-cache-dir

# Copy your code
COPY train_model.py .

# Run the script when the container starts
CMD ["python", "train_model.py"]
Step 5: Take Your Picture
Now create the Docker image:
docker build -t my-ml-model .
The -t flag gives your picture a name, which is a tag. . tells Docker to look in the current directory for the Dockerfile.
You will see that Docker follows each command in your Dockerfile. It might take a minute the first time because it has to download the base Python image.
Step 6: Start Your Container
Finally, start your container:
docker run my-ml-model
In the output, you should see something like “Model Accuracy: 0.98.”
Boom! You just put your first machine learning project in a box.
Knowing How Much Data There Is When You Work With It
This is where things start to get fun. What if you want to save your trained models or use real datasets?
The Problem with Storing Containers
Containers don’t last very long. Everything inside a container is gone when you delete it. That’s great for getting things going again, but not so great for your important data.
Docker Volumes are the way to go.
Volumes let you store data outside of containers. Let’s make our project save the model it trained.
To save the model, change your train_model.py file:
import pickle
# ... old code...

# Keep the model
with open('/data/model.pkl', 'wb') as f:
    pickle.dump(model, f)

print("Model saved to /data/model.pkl")
Now run with a volume:
docker run -v $(pwd)/models:/data my-ml-model
This command links the models folder on your computer to the container’s /data directory. Any file you save to the container’s /data folder will also show up in the models folder on your computer.
Check your models folder. Your trained model is there and ready to use, even if the container stops.
Different types of storage in Docker
Named Volumes: Docker handles where the data is stored. You only need to give it a name:
docker volume create ml-data
docker run -v ml-data:/data my-ml-model
Bind Mounts: You can use bind mounts to choose exactly where on your computer the data lives (like we did above). It’s easier to do most data science tasks with bind mounts because you can get to your data files right away.
How to Use Docker Compose for Difficult Projects
When doing data science projects in the real world, you might need a Jupyter notebook, a database, and a model server to all work together. It’s hard to deal with these one at a time. Enter Docker Compose.
Setting Up More Than One Container
Make a file called docker-compose.yml:
version: "3.8"

services:
  jupyter:
    image: jupyter/datascience-notebook
    ports:
      - "8888:8888"
    volumes:
      - ./notebooks:/home/jovyan/work
    environment:
      - JUPYTER_ENABLE_LAB=yes

  postgres:
    image: postgres:13
    environment:
      - POSTGRES_PASSWORD=mysecretpassword
      - POSTGRES_DB=mldata
    volumes:
      - pgdata:/var/lib/postgresql/data

volumes:
  pgdata:
This creates two services: a Jupyter notebook environment and a PostgreSQL database.
You can start everything with just one command:
docker-compose up
Just as easily, stop everything:
docker compose down
You can use the service names to talk to other services. You can link your Jupyter notebooks to the database at postgres:5432.
A Real-World Case Study: ZEISS Microscopy Solutions
Let’s look at an actual company that uses Docker for AI.
ZEISS Research Microscopy Solutions had a problem: they had to train AI models for image segmentation on their cloud platform and then send those same models to Windows clients with GPUs.
What was the issue? Keeping the cloud training environment and the local execution environment in perfect sync. Scientists hate it when different environments lead to different results.
What did they do? Boxes.
They put each AI model, along with all of its code, libraries, and dependencies, into Docker containers. These containers work the same way whether you’re using them on a cloud training platform or on a Windows computer at home.
The results were great:
Consistency: Models work the same way on all platforms, so the results are the same everywhere.
Efficiency: One codebase works everywhere, so less code duplication.
Faster development: Teams could change AI models without having to change the software that runs them.
Hardware: Containers can easily use GPU resources, even on Windows hosts that run Linux containers.
“Docker’s container solution has changed the game for us, making it easier and more efficient to develop new products.”
— Dr. Sebastian Rhode, Software Architect
Advanced Topics: How to Get Better at Docker
Deep Learning with GPU Support
You’ll need a faster GPU if you want to do deep learning. Docker works with NVIDIA GPUs right away. First, you need to install the NVIDIA Container Toolkit on your PC. Then run containers that can use the GPU:
docker run --gpus all nvidia/cuda:12.0-base nvidia-smi
This lets your container use all of your graphics cards. You can also choose certain GPUs:
docker run --gpus '"device=0,1"' my-dl-model
Images for deep learning from TensorFlow, PyTorch, and NVIDIA that are already popular all support GPU acceleration.
Linking to CI/CD pipelines
Docker works great with processes for continuous integration and deployment. You can make your ML pipeline run by itself:
GitHub gets the code
A new Docker image is made by the CI system.
Tests that run on their own are in containers.
If the tests pass, the image goes into production.
This makes sure that every time a model is deployed, it is tested and can be done again. GitHub Actions, GitLab CI, and Jenkins are all great tools for using Docker.
Kubernetes orchestration
Kubernetes manages Docker containers across clusters when you need to go beyond one machine. Kubernetes handles:
Auto-scaling: When demand goes up, add more containers.
Load balancing: Send traffic to more than one container.
Self-healing: Restart containers that fail on their own.
Rolling updates: Install new versions without having to stop working.
Docker and Kubernetes are a good match. Docker lets you create images, and Kubernetes manages them on a big scale.
Data Scientists: How to Use Docker the Right Way
Let me share some things I’ve learned the hard way that will help you not make the same mistakes.
| Do These Things | Don’t do these things |
| Use Official Base Images: Start with official images from Docker Hub. They are well-documented, safe, and always up to date. | Never put data in containers; always use volumes for data that needs to last. |
| Keep images small: Use slim or alpine versions of base images. Smaller images download faster and are less likely to have security holes. | Don’t run more than one service in a single container. One process, one container. If you need more than one service, use Docker Compose. |
Tagging: Don’t use the newest tag in production when tagging your images. Use version numbers like my-model:v1.2.3. | Don’t keep secrets in pictures: Don’t put passwords or API keys in Dockerfiles. Use environment variables or tools for managing secrets. |
Use .dockerignore: Create a file called .dockerignore. This stops your images from getting too big by keeping out files that aren’t needed. | Use COPY instead of ADD; it’s clearer and safer. |
| Run as a Non-Root User: To keep things safe, add a non-root user to your Dockerfile. | Don’t forget to scan your images for security holes on a regular basis with tools like Docker Scout. |
| Use multi-stage builds to build in one stage and then copy only what you need to the final image. | |
| Optimize Layering: Put things that don’t change often, like installing dependencies, at the top of your Dockerfile. |
The Basics of Networking with Docker
If you have more than one container, you need to know how they communicate with each other.
Standard Bridge Network
By default, Docker makes a bridge network. Container names let containers on the same bridge talk to each other.
docker network create my-network
docker run --name model-api --network my-network my-api
docker run --name my-frontend --network my-network my-frontend
Now, frontend can find model-api by its name.
Host’s Network
When the container is in host mode, it connects directly to the host’s network. This is faster but less private.
docker run --network host my-app
Use this for apps that need direct access to the network and are very important for performance.
Networks Designed Just for You
Make your own networks to split up your containers:
docker network create frontend-net
docker network create backend-net
Your web app can be on the frontend network, and your database can be on the backend network. This makes things safer and more orderly.
How to Stay Away from Common Mistakes That Newbies Make
Let me help you stay out of trouble.
- Mistake #1: Not Using Volumes for DevelopmentWhen you’re developing, mount your code as a volume so that changes show up right away without having to rebuild.Bash
docker run -v $(pwd):/app my-dev-container - Mistake 2: Drawing Big PicturesI once made a 5GB image because I forgot to delete temporary files. For both multi-stage builds and cleanup, use the same RUN command:Dockerfile
RUN apt-get update && apt-get install -y package \ && rm -rf /var/lib/apt/lists/* - Mistake 3: Not putting limits on resourcesContainers can take up all of your resources. Set limits:Bash
docker run --memory="4g" --cpus="2" my-ml-job - Mistake 4: Not Knowing How Layer Caching WorksThe order of things in Dockerfiles matters. Put things that change a lot, like your code, at the end so that Docker can save the layers that come before them.
- Mistake 5: Allowing Everything to Run as RootMake a user every time:Dockerfile
RUN useradd -m myuser
USER myuser
FAQ’s
1. Do I need to know how to use Docker to be a data scientist?
Not necessary, but it will make things a lot easier for you. Docker helps you solve problems that come up in the real world, like environments that aren’t consistent, problems with deployment, and problems with reproducibility. This skill is also important to employers.
2. Is it hard to learn how to use Docker?
To be honest? It’s not too hard to get the basics. You can finish things in a day. The main ideas are images, containers, and volumes, and they are not hard to understand. You don’t need to know advanced things like orchestration to get started, but it takes longer to learn them.
3. Can you run Docker on a Mac or Windows computer?
Yes! Docker Desktop works well on Windows, Mac, and Linux, which are the three most popular operating systems. It runs virtualization in the background on Windows and Mac, but you won’t see it.
4. How can I give my team access to my Docker images?
You can send them to Docker Hub or a private registry, such as AWS ECR or Azure ACR. Your team can then get them:
docker push yourusername/my-ml-model:v1
docker pull yourusername/my-ml-model:v1
5. What about safety? Are containers safe?
Containers are usually safe if you use them correctly. Use official images, check for security holes, don’t run as root, and make sure your images are always up to date. Docker Scout can scan by itself.