How to Deploy an ML Model: From Jupyter Notebook to Production API
Introduction:
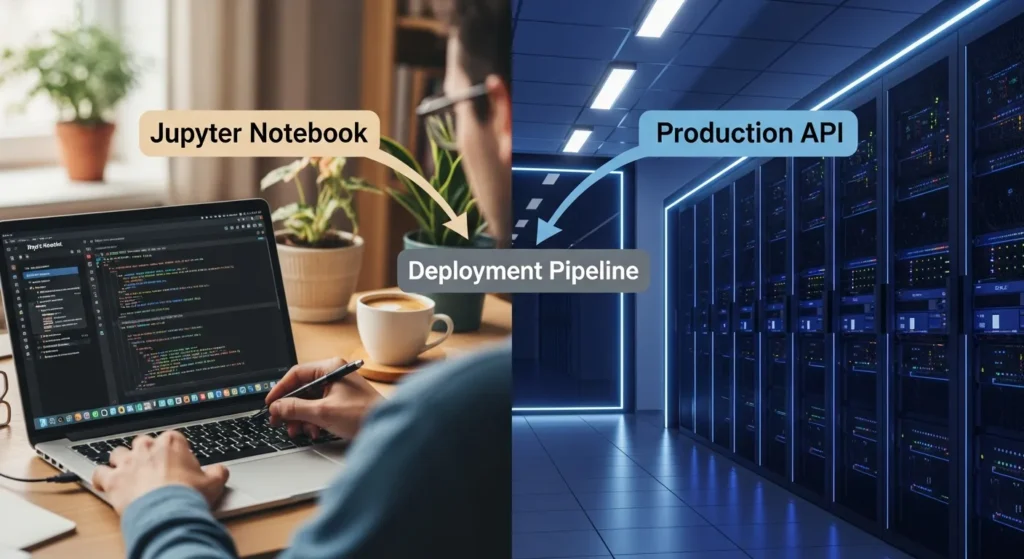
No one tells you this when you’re learning machine learning: building a model and deploying it are two very different things. You can make a great model in your Jupyter notebook that works 95% of the time, but if you can’t get it to work in the real world, where real people can use it, it’s just an expensive homework assignment.
I’ve been there. I worked on a model for weeks, ran it a thousand times on my own computer, and then realised I had no idea how to share it. That’s when the real learning started, and that’s what this post is about.
By the end of this guide, you’ll know how to turn that beautifully trained model in your notebook into a live API that can handle real requests, grow with demand, and actually serve users. We’ll go over every step: serialisation, containerization, picking the right framework, picking a platform, and yes, even the monitoring part that everyone skips but shouldn’t.
This guide covers everything from launching your first side project to shipping models for thousands of users.
Why Deployment is Where the Real ML Work Happens
Most data science courses end with “Congrats! Your model works!” But that’s not the finish line. That’s the starting gun. Everything changes when your model goes from your laptop to production. You are no longer working with a controlled dataset on your computer. Now you have real data, edge cases, different hardware, concurrency problems, and worst of all, users who really need your predictions to work.
The biggest mistake I see beginners make is they train their model and then ask, “How do I put this on a website?” But that’s not the right question. The right question is, “How do I make my model a reliable service?”
Deployment isn’t just about technology. It’s about being responsible, reliable, and able to reproduce. Your model needs to:
Work the same way in different environments
Handle errors well when something goes wrong
Scale well when demand goes up
Stay accurate as real-world data changes
It is easy to monitor, so you know when it breaks
This is why most companies spend 80% of their ML time on deployment and monitoring instead of building models. Welcome to the real world.
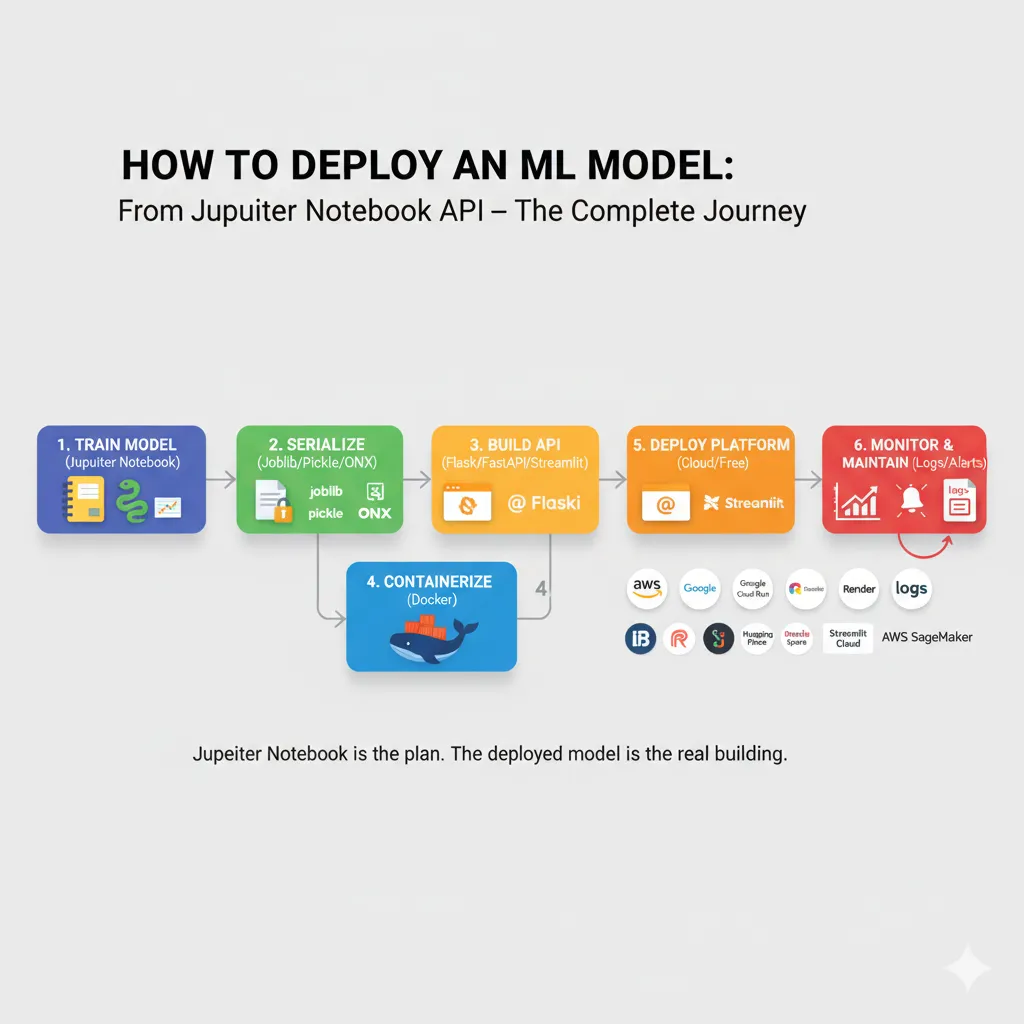
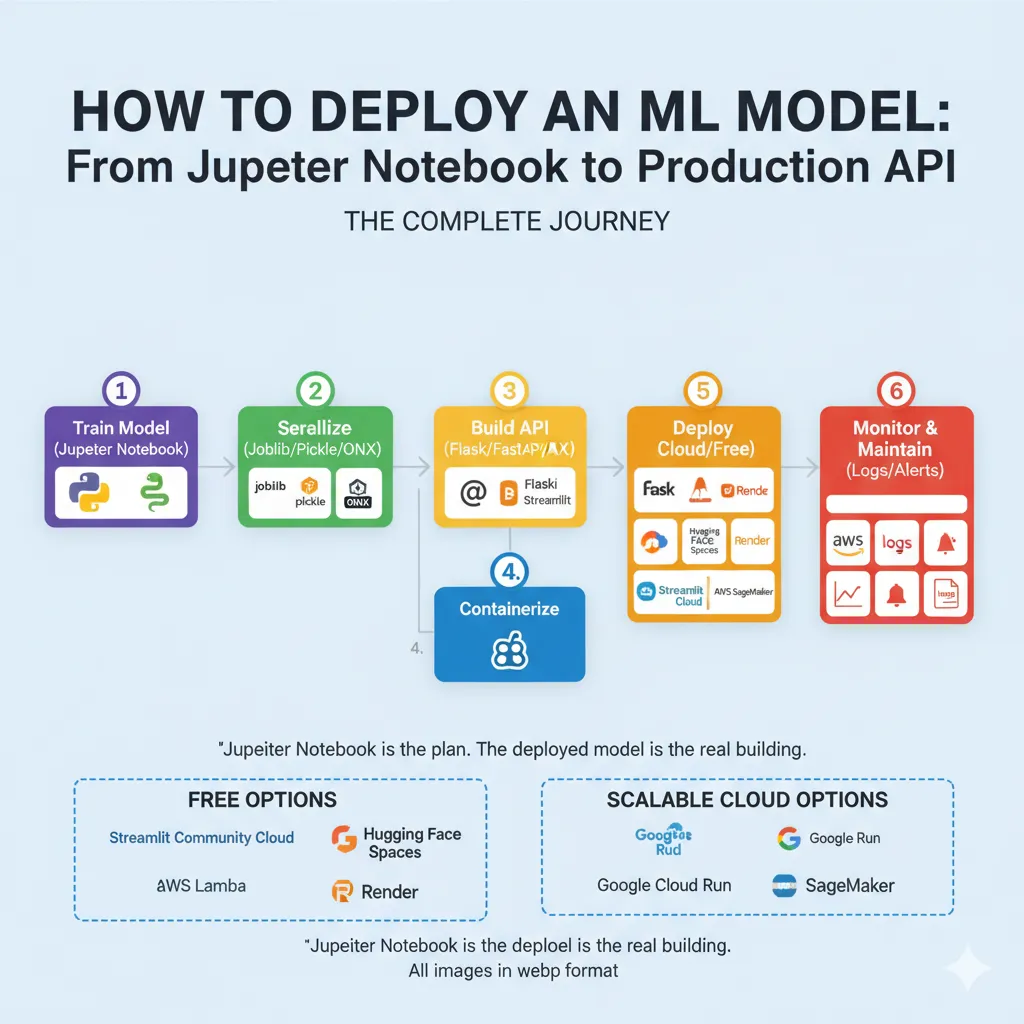
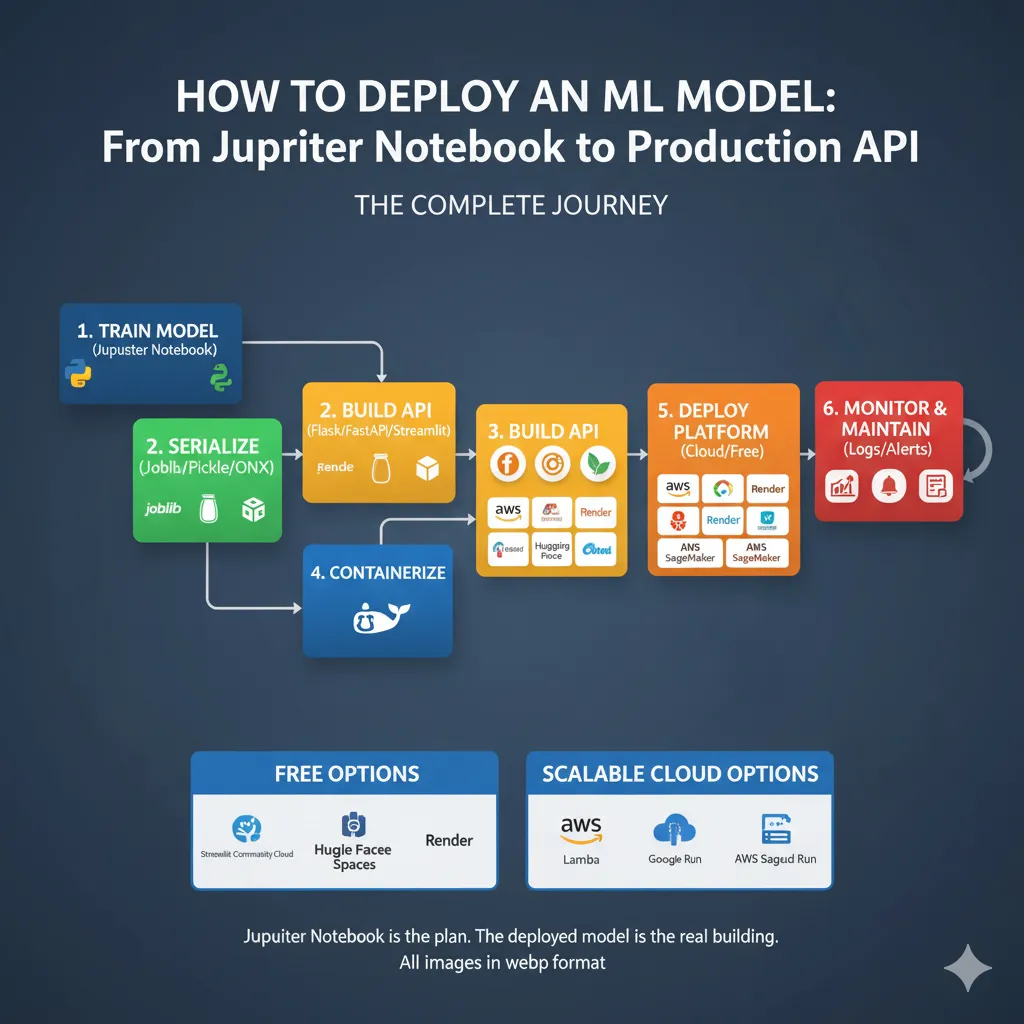
Before we start coding, let’s figure out what we’re really doing with the Deployment Pipeline. This is the whole trip:
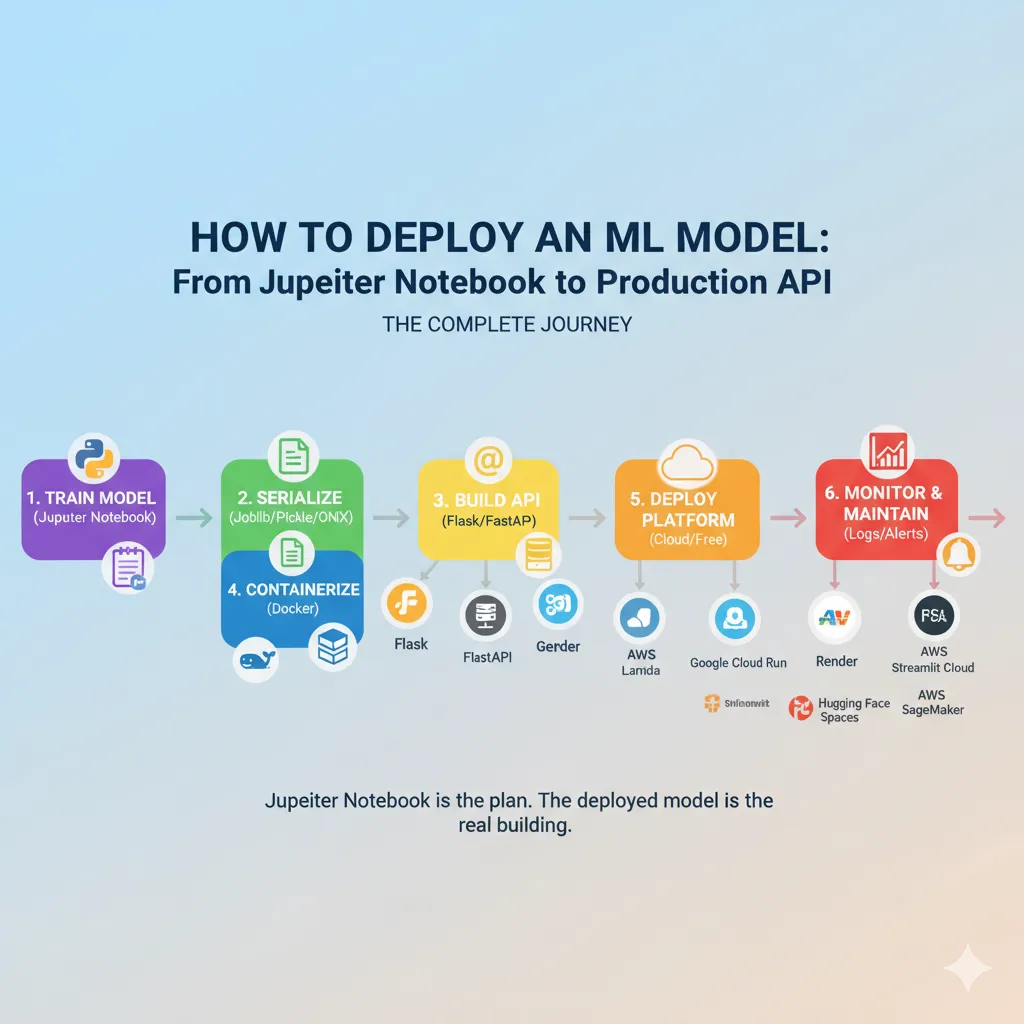
You could say that your Jupyter notebook is the plan. The deployed model is the real building that thousands of people use every day. Each step is very important.
Step 1: Getting Your Model Ready for Deployment
Your Jupyter notebook isn’t meant for production. It has code for exploring, comments, and maybe even some debugging sessions that got pizza on them. We need to clean this up.
Save Your Trained Model
After training, your model is stored in memory. It’s gone as soon as you close your notebook. So first, we serialize it, which means turning it into a file that can be loaded and used later.
For most sklearn and tree-based models, use joblib (which is faster than pickle for numpy arrays):
Python
# After you train your model
model = RandomForestClassifier()
model.fit(X_train, y_train)

# Keep it
joblib.dump(model, 'model.pkl')
For deep learning (TensorFlow, PyTorch), use formats that are specific to the framework, like:
Python
# PyTorch
torch.save(model.state_dict(), 'model.pth')

# TensorFlow
model.save('model.h5')
Why use joblib instead of pickle?
Joblib is the industry standard for working with large numpy arrays because it works better. Pickle works too, but it’s slower for complicated models.
Don’t just serialize the raw model; make a prediction function.
Put it in a clean prediction function like this:
Python
def predict(input_features):
    """
    Takes raw input, processes it, and makes a prediction.
    """
    # Preparing
    processed_features = preprocess(input_features)

    # Load the model (or think it's already loaded)
    prediction = model.predict(processed_features)

    # After processing
    result = format_output(prediction)

    return result
This is more important than you might think. In production, raw model predictions aren’t enough. You have to deal with missing values, make sure inputs are in the right format, and make sure outputs are always in the right format. Building this into one function keeps your API code clean.
Step 2: Choose Your API Framework
Now we need to make your model available as an API, which is a service that takes requests and gives predictions.
Flask: The Classic Choice
Best for: Traditional web apps, simple APIs, when you need full control
Flask is lightweight, has massive community support, and feels familiar if you’ve done web development. Here’s a simple example:
Python
from flask import Flask, request, jsonify
import joblib

app = Flask(__name__)
model = joblib.load('model.pkl')

@app.route('/predict', methods=['POST'])
def guess():
    data = request.json
    input_features = [data['feature1'], data['feature2']]
    prediction = model.predict([input_features])[0]
    return jsonify({'prediction': float(prediction)})

if __name__ == '__main__':
    app.run(debug=False, port=5000)
Simple. Reliable. Works everywhere.
FastAPI: The Modern Alternative
Best for: Building production APIs quickly, when you want auto-documentation and async support
FastAPI is newer but it’s gaining fast adoption because it’s genuinely superior for APIs. It handles data validation automatically, generates documentation, and runs faster than Flask:
Python
from fastapi import FastAPI
from pydantic import BaseModel
import joblib

app = FastAPI()
model = joblib.load('model.pkl')

class PredictionInput(BaseModel):
    feature1: float
    feature2: float

@app.post('/predict')
def predict(input_data: PredictionInput):
    features = [input_data.feature1, input_data.feature2]
    prediction = model.predict([features])[0]
    return {'prediction': float(prediction)}
The main difference is that FastAPI checks your input automatically and makes interactive API documentation available at /docs. You really do get Swagger UI for free.
Streamlit: The Data Science Shortcut
Best for: Interactive dashboards, demos, and when you want to avoid backend complexity.
Streamlit is made for data scientists who don’t want to become full-stack developers. You don’t need an API backend; just:
Python
import streamlit as st
import joblib

model = joblib.load('model.pkl')

st.title('ML Prediction App')

feature1 = st.slider('Feature 1', 0.0, 10.0)
feature2 = st.slider('Feature 2', 0.0, 10.0)

if st.button("Predict"):
    prediction = model.predict([[feature1, feature2]])[0]
    st.success(f'Prediction: {prediction}')
Deploy to Streamlit Cloud in just five minutes. What do you have to give up? It’s not a standard API, and if you only need endpoints, it might be too much.
My Suggestion: I suggest using FastAPI for production APIs, Streamlit for internal dashboards and demos, and Flask if you need to customise something or already know how to use Flask.
Step 3: Build and Test Locally
Before shipping anything, test it locally. This is where most problems with deployment are found early.
Run Your API Server
Bash
# FastAPI (needs uvicorn)
pip install fastapi uvicorn
uvicorn main:app --reload

# Flask
pip install flask
python app.py
Your API is now live at localhost:5000 (Flask) or localhost:8000 (FastAPI).
Test Your Endpoints
With curl:
Bash
curl -X POST "http://localhost:8000/predict" \
-H "Content-Type: application/json" \
-d '{"feature1": 5.0, "feature2": 3.0}'
Or use Python:
Python
import requests

response = requests.post(
    'http://localhost:8000/predict',
    json={'feature1': 5.0, 'feature2': 3.0}
)

print(response.json())
Test edge cases:
What if someone sends invalid data?
What if the model can’t make a prediction?
How long does it take to make a prediction?
Can it handle concurrent requests?
If you get these right locally, you’ll save yourself hours of debugging later.
Step 4: Containerize with Docker
This is where deployment stops being “my code works on my machine” and starts being “my code works everywhere.” Docker packages your entire application—code, dependencies, Python version, everything—into a container that runs the same way on your laptop, your coworker’s Mac, or AWS. It’s the main reason why deployment works so well these days.
To make a Dockerfile, type:
Dockerfile
FROM python:3.11-slim

WORKDIR /app

# Copy the needs
COPY requirements.txt .
RUN pip install -r requirements.txt --no-cache-dir

# Copy the code and model for the app
COPY app.py .
COPY model.pkl .

# Open port
EXPOSE 8000

# Start the app
CMD ["uvicorn", "app:app", "--host", "0.0.0.0"]
This says: Start with Python 3.11, install our dependencies, copy our code, and run the app accessible on port 8000.
Create requirements.txt
Code
fastapi==0.104.1
uvicorn==0.24.0
joblib==1.3.2
scikit-learn==1.3.2
Build and Test
Bash
# Make the image
docker build -t my-ml-api .

# Run on your own computer
docker run -p 8000:8000 my-ml-api

# Test it
curl http://localhost:8000/predict
Now your app works the same way no matter where you are. No more “it works on my machine” excuses.
Step 5: Choose Your Deployment Platform
This is where the real “deployment” takes place. You have choices:
Let me explain the choices in the real world:
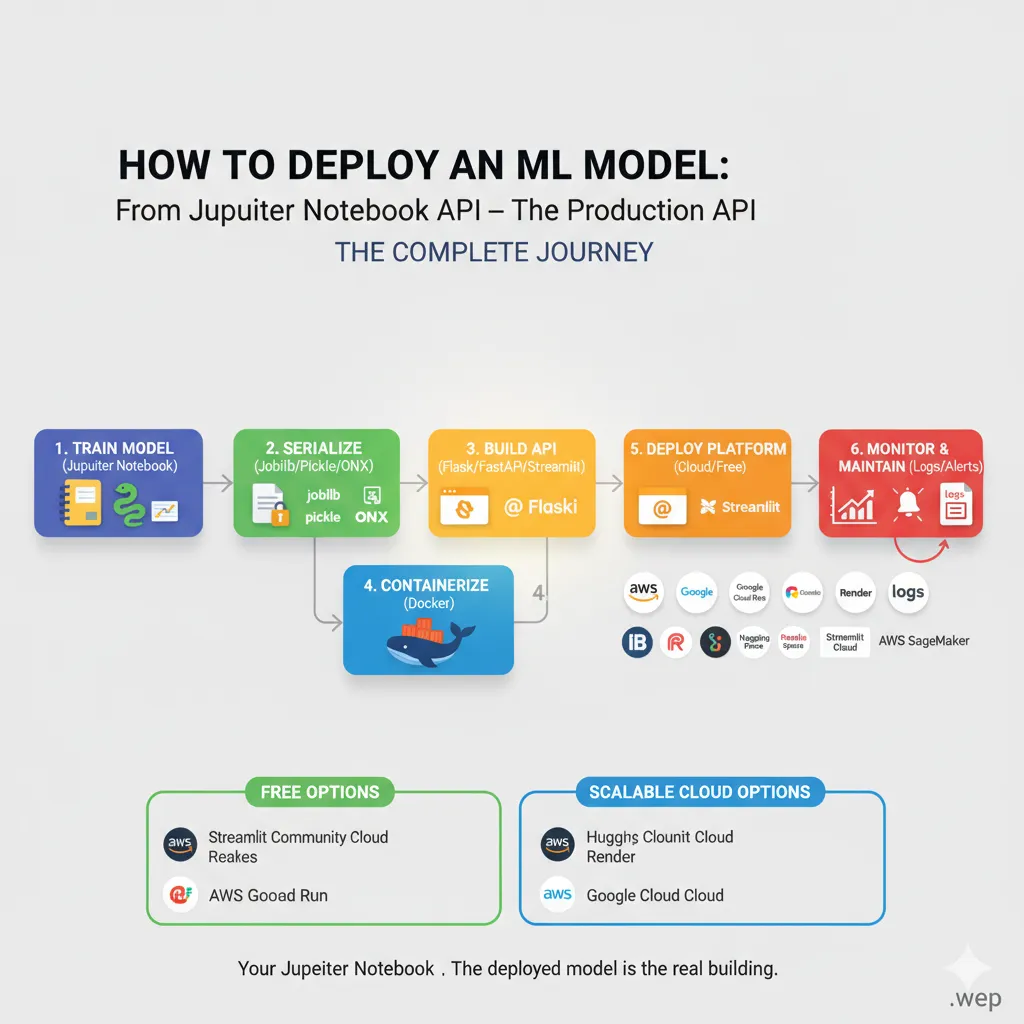
Free Options (Great for Beginners)
Streamlit Community Cloud—Upload your code to GitHub and link it to Streamlit Cloud. Finished. Streamlit apps are really that easy. Five minutes, no setup.
Hugging Face Spaces is like Streamlit Cloud, but it works with any Python framework, including Gradio, Streamlit, and FastAPI with Docker. The free tier gives you two vCPUs and 16GB of RAM.
Render is great for demos and portfolios. You can upload your Docker container or connect to GitHub. The free tier gives you 750 hours a month. Better for Flask/FastAPI apps than Streamlit.
Scalable Cloud Options (When You Get Real Traffic)
AWS Lambda—Serverless. You only pay for the time your model needs to run. Great for short-term use, but annoying if you want a permanent server. Costs almost nothing for low-traffic projects, but takes more time to set up.
Google Cloud Run is Google’s version of Lambda. A little more flexible, has great documentation, and works well with GCP services. Free tier: 2 million requests per month.
AWS SageMaker is the business option. It takes care of everything, from training to versioning to deployment to monitoring. Too much for side projects but normal for big companies.
My Deployment Recommendation Flow:
Do you just want to show a demo? → Streamlit Cloud or Hugging Face Spaces (only 5 minutes)
Making a real API with Flask or FastAPI? → Render or Railway (free tier, easy setup)
Do you need to deal with traffic that changes? → AWS Lambda or Cloud Run (pay-per-use)
For business deployment? → SageMaker, Vertex AI, or managed Kubernetes
Real-World Case Study: A Churn Prediction Model
Let me walk you through what an actual deployment looks like.
The Problem: A SaaS company needs to predict which customers will churn next month so they can send special retention offers. The model trains every day on new customer data and has to score thousands of customers in real time.
Their solution:
Model Training (Python) — Scikit-learn RandomForest, trained every day on AWS. Model saved as a joblib pickle.
The API Server is FastAPI with a /predict endpoint. Takes customer features and returns the chance of churn.
Containerization: Dockerfile packages the API and model into one container (200MB).
Deployment: The container is deployed to Google Cloud Run with auto-scaling. When traffic spikes (like when daily batch scoring happens), it automatically makes more instances.
Monitoring keeps an eye on prediction latency, error rates, and model performance. If the accuracy drops below a certain level, alerts go off so that they can retrain.
The API responds in less than 50 milliseconds, costs about $50 a month in cloud computing (pay-per-use model), and can easily handle 10 to 10,000 concurrent predictions. The point? This isn’t hard. It’s a simple pipeline that any developer can make.
Here’s a step-by-step example of how to deploy your first model. I’ll give you the exact code to deploy a simple model from start to finish.
Model Training (train.py)
Python
from sklearn.datasets import load_iris
from sklearn.model_selection import train_test_split
from sklearn.ensemble import RandomForestClassifier
import joblib

# Load the data
iris = load_iris()
X, y = iris.data, iris.target

# Train
X_train, X_test, y_train, y_test = train_test_split(X, y, test_size=0.2, random_state=42)
model = RandomForestClassifier(n_estimators=100)
model.fit(X_train, y_train)

# Keep
joblib.dump(model, 'iris_model.pkl')
print(f"Model accuracy: {model.score(X_test, y_test):.2f}")
The API (app.py)
Python
from fastapi import FastAPI
from pydantic import BaseModel
import joblib
import numpy as np

app = FastAPI(title="Iris Classifier")

# Load the model once when the program starts
model = joblib.load('iris_model.pkl')
iris_classes = ['setosa', 'versicolor', 'virginica']

class IrisInput(BaseModel):
    sepal_length: float
    sepal_width: float
    petal_length: float
    petal_width: float

@app.post('/predict')
def predict(data: IrisInput):
    features = np.array([
        data.sepal_length,
        data.sepal_width,
        data.petal_length,
        data.petal_width
    ]).reshape(1, -1) # Reshape for single prediction

    prediction_idx = model.predict(features)[0]
    probabilities = model.predict_proba(features)[0]

    return {
        'class': iris_classes[prediction_idx],
        "confidence": float(probabilities[prediction_idx])
    }

@app.get('/health')
def health():
    return {'status': 'ok'}
Docker Setup (Dockerfile)
Dockerfile
FROM python:3.11-slim

WORKDIR /app
COPY requirements.txt .
RUN pip install -r requirements.txt

COPY app.py iris_model.pkl ./

EXPOSE 8000
CMD ["uvicorn", "app:app", "--host", "0.0.0.0", "--port", "8000"]
You’ll also need a requirements.txt file for this example:
Code
fastapi==0.104.1
uvicorn==0.24.0
joblib==1.3.2
scikit-learn==1.3.2
numpy==1.26.2
Deploy to Render
Push to GitHub: Commit all files (train.py, app.py, iris_model.pkl, requirements.txt, Dockerfile) to a GitHub repository.
Connect Render to your repo: Go to Render.com, create a new Web Service, and connect it to your GitHub repository.
Select “Docker” deployment: Render will detect your Dockerfile.
Set start command: uvicorn app:app –host 0.0.0.0 –port 8000
Deploy: Click the deploy button.
Your API is live in 2 minutes!
The Hidden Part Everyone Skips: Monitoring and Maintenance
You deploy your model and celebrate. Two weeks later, you get an angry customer email: “Your predictions are garbage now.” You check and… accuracy dropped from 92% to 71%. What happened?
Data drift.
The real world changed. The patterns your model learned are no longer true. This is the sneaky part of deployment—your model doesn’t stay accurate. It degrades over time.

What to Monitor
Prediction latency — Is your API slow? Users notice if predictions take >1 second.
Error rates — When requests fail, log them. A spike in errors often means bad input data.
Prediction drift — Are your model’s outputs changing dramatically? Could indicate data drift.
Data drift — Are the input features behaving differently than during training? This kills accuracy.
Model accuracy — Compare predictions against actual outcomes (this data comes later). If accuracy degrades, retrain.
Simple Monitoring Example
Python
import logging
from datetime import datetime

logging.basicConfig(level=logging.INFO)

@app.post('/predict')
def predict(data: IrisInput):
    start_time = datetime.now()

    try:
        # Make a guess (assuming features are prepared as in the app.py example)
        features = np.array([
            data.sepal_length,
            data.sepal_width,
            data.petal_length,
            data.petal_width
        ]).reshape(1, -1)

        prediction_idx = model.predict(features)[0]

        # Keep track of everything
        latency = (datetime.now() - start_time).total_seconds()
        logging.info(f"Prediction: {iris_classes[prediction_idx]}, Latency: {latency:.3f}s")

        return {'class': iris_classes[prediction_idx]}

    except Exception as e:
        logging.error(f"Prediction failed: {str(e)}")
        return {'error': 'Prediction failed'}, 500
Store these logs, analyze them daily. Set up alerts for anomalies. When accuracy drops, trigger a retraining pipeline. Real companies use tools like Datadog, Arize, or Evidently AI for sophisticated monitoring. But even basic logging gives you 80% of the benefit.
Practical Tips That Actually Matter
1. Version Everything
Don’t just save model.pkl. Save model_v2_2024_jan_15.pkl. Include which training data, which hyperparameters, which code version. Future you will be grateful.
2. Pre-process in Your API, Not in Your Model
Your Jupyter preprocessing code is messy. Move it into your API. This way, if you update preprocessing, you don’t need to retrain the model.
Python
def preprocess(raw_data):
    """This is where all the preprocessing happens."""
    # Take care of missing values
    # Scale the features
    # Encode categories
    return processed_data

@app.post('/predict')
def predict(raw_input):
    cleaned = preprocess(raw_input)
    return model.predict(cleaned)
3. Test Your API Like Production Code
Write actual tests:
Python
def test_predict_endpoint():
    # Using a test client for FastAPI, for example
    client = TestClient(app)
    response = client.post(
        '/predict',
        json={
            "sepal_length": 5.1,
            "sepal_width": 3.5,
            "petal_length": 1.4,
            "petal_width": 0.2
        }
    )

    assert response.status_code == 200
    assert 'class' in response.json()
4. Write down your model.
What features does it expect? What format should the output be in? What level of accuracy should it have? Add this to your API:
Python
@app.get('/model-info')
def model_info():
    return {
        "name": "Iris Classifier",
        'version': '1.0',
        'features': ['sepal_length', 'sepal_width', 'petal_length', 'petal_width'],
        'classes': ['setosa', 'versicolor', 'virginica'],
        "training_accuracy": 0.97,
        "deployed_date": "2024-01-15"
    }
5. Set Resource Limits:
When deploying, set limits on memory and CPU. This stops processes from going out of control and destroying your infrastructure. You can do this in your deployment config (Render, Google Cloud Run, etc.).
memory: 1Gi
cpu: 0.5
6. Use Async for I/O Operations
If your model calls external APIs (getting data, logging, etc.), use async to handle multiple requests efficiently:
Python
@app.post('/predict')
async def predict(data: IrisInput):
    # This now works better with multiple requests at the same time
    prediction = await model.predict_async(features) # Assuming model has an async predict
    return prediction
Common Deployment Mistakes (And How to Avoid Them)
Mistake #1: Loading the model on every request
Python
# ❌ BAD - loads model for every single request
@app.post('/predict')
def predict(data):
    model = joblib.load('model.pkl') # This takes a long time!
    return model.predict(...)

# ✅ GOOD—loads once when it starts up
model = joblib.load('model.pkl')

@app.post('/predict')
def predict(data):
    return model.predict(...)
Mistake #2: Forgetting about input validation
Your Jupyter notebook assumes clean data. Production gets garbage. Use Pydantic to validate:
Python
# ✅ This validates automatically
class PredictionInput(BaseModel):
    age: int     # Must be an integer
    income: float # Must be a number

    class Config:
        json_schema_extra = {'example': {'age': 30, 'income': 50000.0}}

@app.post('/predict')
def predict(data: PredictionInput):
    # The types in data are sure to be correct
    ...
Mistake #3: Deploying without proper error handling.
Users send strange things. Handle it gracefully:
Python
@app.post('/predict')
def predict(data: PredictionInput):
    try:
        prediction = model.predict(...)
        return {'prediction': prediction}
    except Exception as e:
        logging.error(f"Error: {e}")
        return {'error': 'Prediction failed'}, 500
Mistake #4: Leaving debug mode on in production
Python
# ❌ BAD
if __name__ == '__main__':
    app.run(debug=True) # This is a security risk!

# ✅ GOOD
if __name__ == '__main__':
    app.run(debug=False) # Ready for production
Comparing Deployment Approaches: Flask vs FastAPI vs Streamlit
When should you use each? Here’s the breakdown:
| Framework | Best For | Pros | Cons |
| Flask | Traditional web apps, simple APIs, full control | Lightweight, large community, familiar | Slower, less modern, manual validation |
| FastAPI | Production APIs, auto-documentation, async | Fast, automatic data validation, auto-docs | Newer, less mature community than Flask |
| Streamlit | Interactive dashboards, demos, no backend | Fast demos, no backend code, easy to deploy | Not a traditional API, limited customisation |
If you’re making a production API, use FastAPI. It’s faster, newer, and needs less boilerplate code than Flask. If you just want to show off a quick demo, use Streamlit. Flask is great if you have old code or need to make specific changes.
Model Serialization: Pickle, Joblib, or ONNX?
Your model needs to go from notebook to API. How you save it matters.
Pickle is the standard way to serialize Python objects. It works for anything, but it’s slower for large models.
Python
pickle.dump(model, open('model.pkl', 'wb'))Joblib is better for numpy arrays and faster than pickle. It’s the standard for sklearn.
Python
joblib.dump(model, 'model.pklONNX is an open format that works with all frameworks. It has faster inference but needs more setup.
Python
# Needs to be converted, which is more complicated.
My advice is to use joblib for sklearn/XGBoost models and framework-native formats for deep learning (.h5 for TensorFlow, .pth for PyTorch). Use ONNX only if you need to be able to work on different platforms.
Scaling: When Your Model Becomes Popular
Your model works great with 10 requests per second. What happens at 1,000?
Option 1: Horizontal Scaling
Spin up more server instances and let the load balancer distribute requests. This is what cloud platforms do automatically.
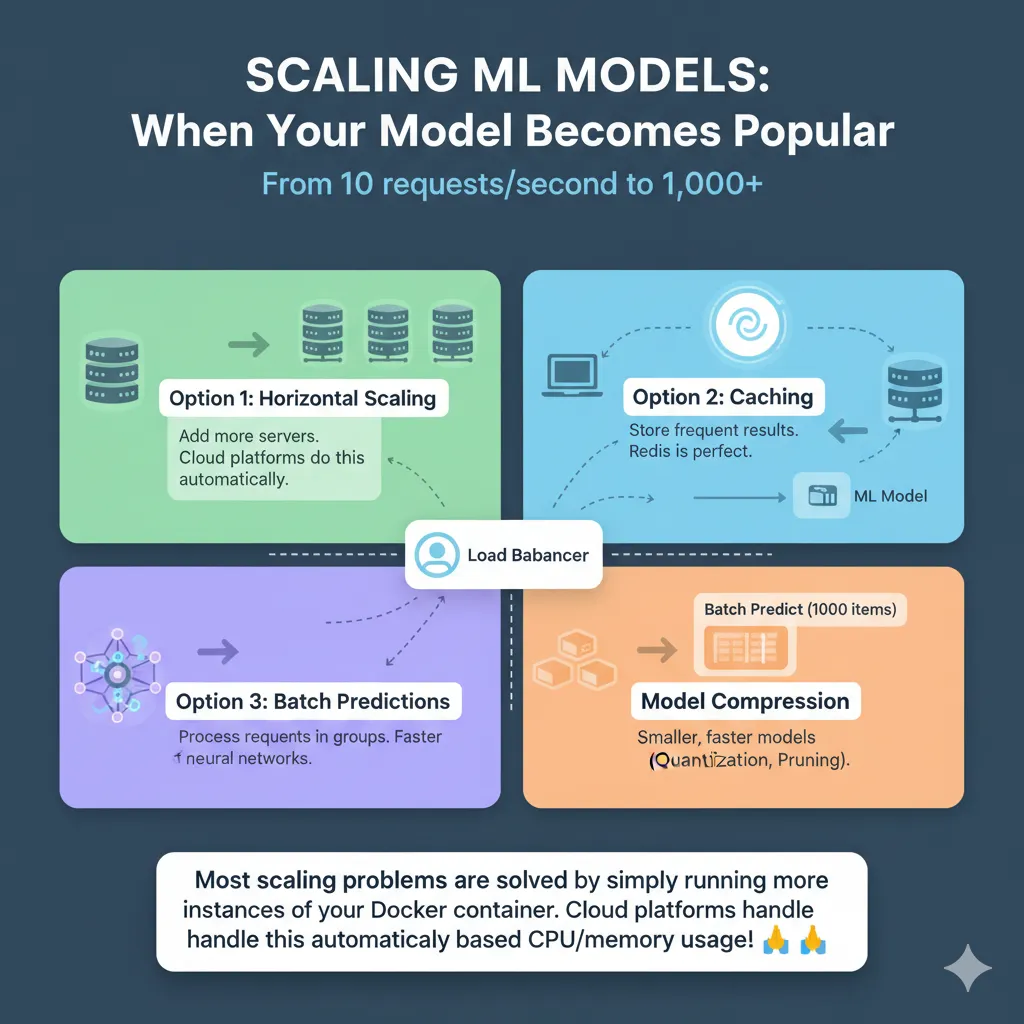
Option 2: Caching
If users request the same input, return the cached result instead of recomputing. Redis is perfect for this.
Python
import redis
import json

cache = redis.Redis()

@app.post('/predict')
def predict(data: IrisInput):
    # Make a key for the cache
    cache_key = f"{data.sepal_length}_{data.sepal_width}_{data.petal_length}_{data.petal_width}"

    # Check the cache
    cached = cache.get(cache_key)
    if cached:
        return json.loads(cached)

    # Guess what will happen (assuming features are prepared)
    features = np.array([
        data.sepal_length,
        data.sepal_width,
        data.petal_length,
        data.petal_width
    ]).reshape(1, -1)

    prediction_idx = model.predict(features)[0]
    probabilities = model.predict_proba(features)[0]

    result = {
        'class': iris_classes[prediction_idx],
        "confidence": float(probabilities[prediction_idx])
    }

    # Store for one hour
    cache.setex(cache_key, 3600, json.dumps(result))

    return result
Option 3: Batch Predictions
Instead of one-at-a-time, collect requests and predict on batches. Much faster for neural networks.
Option 4: Model Compression
Quantization, pruning, distillation. Make the model smaller and faster. This is deep learning specific.
Most scaling problems are solved by simply running more instances of your Docker container. Cloud platforms handle this automatically based on CPU/memory usage!
Deployment Platforms Deep Dive
Streamlit Cloud: The Fastest Route to Demo
Push code to GitHub: git push origin main
Go to share.streamlit.io, connect GitHub
Select your repo and file
Done.
That’s literally it. Your Streamlit app is live with a public URL in 5 minutes.
Pros: Incredibly fast, zero backend complexity, free tier is generous
Cons: Can’t use as traditional API (HTTP requests only), performance limited, not ideal for heavy compute
Hugging Face Spaces: Like Streamlit Cloud but Flexible
Same simplicity as Streamlit Cloud but supports Docker, so you can deploy any Python app:
Create Space on huggingface.co
Add the Dockerfile and requirements.txt files
Push the code (git or web upload)
Hugging Face builds and deploys
Pros: Works with any framework (Flask, FastAPI, Streamlit), has a generous free tier, and a great community.
Cons: It can take longer to build, and cold starts are slow.
Render: Professional Hosting, Beginner-Friendly
Push code to GitHub
Link Render to your repo
Choose “Docker” as the deployment option
Pick a region and set environment variables
Deploy (2-3 minutes)
Pros: More powerful than Streamlit Cloud, free tier with 750 hours/month, plays nice with Docker
Cons: A little more setup than Streamlit
AWS Lambda: Serverless Revolution
Perfect for models that don’t need to be up all the time. You pay per execution:
Write Python handler
Zip up the model and its dependencies into a package
Send to Lambda
Make an endpoint for the API Gateway
Your model is an HTTP endpoint
Pros: Very cheap if traffic changes, scales up automatically, works with AWS
Cons: More complicated to set up, 15-minute execution timeout, package size limits (models need layers)
Free Deployment: The Complete List
| Category | Platform (Best for) | Notes |
| Demos | Streamlit Cloud (5 minute deployment) | Easiest for interactive data apps. |
| Hugging Face Spaces (5 minute deployment) | Supports any Python framework with Docker. | |
| Google Colab (notebook hosting) | Can host notebooks temporarily, but not a true deployment. | |
| APIs | Render (Flask/FastAPI, 750 hours free/month) | Good for persistent APIs, easy Docker integration. |
| Railway (Flask/FastAPI, free tier) | Similar to Render, easy for Dockerized web services. | |
| Google Cloud Run (2M requests/month free) | Serverless container platform, scales to zero. | |
| AWS Lambda (1M requests/month free) | Serverless function, pay-per-execution. | |
| Heroku (deprecated free tier as of Nov 2022) | No longer a free option for new projects. | |
| Data Apps | Google Sheets with ML.NET | For simpler ML tasks integrated directly into spreadsheets (requires C#/.NET). |
| Jupyter Notebooks (persistent, but not traditional deployment) | Can be hosted on cloud services (e.g., AWS SageMaker Notebook Instances) but not for public-facing APIs. | |
| Observable (JavaScript ML) | For interactive data visualizations and simpler ML models in the browser (JavaScript-focused). |
Real talk: For learning and side projects, pick Streamlit Cloud or Hugging Face Spaces. They’re free, reliable, and designed exactly for this use case.
Production Checklist: Before Your Model Goes Live
Before deploying, ensure you’ve ticked off every item on this list. This will save you countless hours of debugging and potential headaches down the line.
✅ Model serialized and versioned
✅ Extracted and tested the prediction function
✅ Made an API and tested it locally
✅ Dockerfile made and tested on a local machine
✅ All dependencies are listed in requirements.txt
✅ Handling errors for bad inputs
✅ Logging set up
✅ The model info endpoint is available
✅ Health check endpoint is available
✅ Tests for the unit pass
✅ Tested with 100 or more requests at the same time
✅ Use Pydantic (or something similar) to check the input
✅ Environment variables for private information
✅ There is model versioning in place
✅ Set up monitoring and alerts
✅ Written documentation
✅ Checked security (API tokens if needed)
✅ Deployment script or automated CI/CD
Don’t deploy without this checklist. Future you will be grateful.
The Truth About Deploying ML Models
Deploying isn’t magic. It’s not complicated. It’s just a sequence of straightforward steps:
Train your model (You already know how to do this)
Save it (Joblib takes 1 line)
Wrap it in an API (FastAPI takes 10 lines)
Containerise it (Docker takes 10 lines)
Deploy it (Click a button or run deploy)
Monitor it (Log metrics)
The hardest part is usually just starting. Once you deploy your first model, the second is easy. Stop overthinking it. Pick any platform from this guide, deploy something today. You’ll learn more in 20 minutes of actual deployment than reading another tutorial.
Conclusion: From Notebook to Production Isn’t Rocket Science
Here’s what we’ve covered:
You learned that deployment is where the real work begins, not where it ends. A model in production needs to be reliable, scalable, and monitorable—not just accurate.
You discovered that framework choice matters: FastAPI for production APIs, Streamlit for demos, Flask for flexibility.
You understood that containerization (Docker) is the linchpin that makes everything work reliably across environments.
You saw that you’ve got multiple deployment paths: free options for learning (Streamlit Cloud, Hugging Face), scalable options for real traffic (AWS Lambda, Google Cloud Run), and everything in between.
Most importantly, you now have a concrete roadmap: notebook → serialization → API → Docker → deploy → monitor.
The gap between “my model works in Jupyter” and “my model works in production” isn’t knowledge. It’s execution. You’ve now got the knowledge.
What’s next? Pick a simple model you’ve trained, follow the steps from this guide, and deploy it somewhere. Render or Streamlit Cloud would take you 15 minutes start-to-finish. The only way to really learn deployment is to actually deploy something.
The hardest part is the first deployment. After that? It becomes routine.
5 FAQs on ML Model Deployment
1. Why can’t I just use my Jupyter notebook as a web app?
Jupyter notebooks are designed for exploration and experimentation, not production services. They’re stateful, require manual restarting, don’t handle concurrent requests, and aren’t designed for security. When you deploy, you’re building a stateless, reliable, scalable service—which is fundamentally different from a notebook.
2. Which deployment platform should I choose if I’m just starting out?
If you want the absolute easiest path: Streamlit Cloud. Connect your GitHub repo, click deploy, done in 5 minutes. If you want a traditional API (HTTP endpoints), go with Render or Railway. Both have free tiers and handle Docker deployment seamlessly. Avoid the major cloud providers (AWS/GCP) until you need production-grade scalability—they have unnecessary complexity for beginners.
3. How do I know my deployed model is working correctly?
Set up monitoring from day one. Log every prediction with timestamp, latency, and result. Track error rates. Most importantly, collect ground truth—actual outcomes over time—and compare with predictions. When accuracy drops, your model needs retraining. Use tools like Evidently AI or even just basic logging to CSV files. The worst time to discover a broken model is when your users tell you.
4. What’s the difference between batch prediction and real-time prediction, and which should I use?
Batch prediction: Process many samples at once (e.g., score 100,000 customers overnight). Slower latency but more efficient compute.
Real-time prediction: Scoring one sample at a time as requests come in. This means higher latency but instant results.
Use batch for processing that happens overnight (like churn scoring and recommendations) and real-time for features that users see (like fraud detection and personalization). Most projects start with one and add the other later.
5. How do I stop my model from getting worse in production?
This is called concept drift or data drift. Keep an eye on prediction accuracy all the time. Set up automated retraining pipelines to retrain on new data every month or quarter. Version your models so you can go back to an old version if a new one doesn’t work as well. Keep an eye on your input features over time. If the patterns change a lot, retrain. Use tools like DVC (data version control) to make sure your results are consistent.


Pingback: MLOps for Startups: Doing More with Less - Bing Info
Pingback: How to Monitor ML Models for Performance Decay and Data Shift | Complete Guide 2025 - Bing Info
Pingback: Privacy-Preserving Machine Learning: A Comprehensive Guide to Federated Learning and Beyond - Bing Info